Chapter 2 编译原理#
编译的核心过程#
词法与语法分析、类型检查和 AST 转换、通用 SSA 生成和 机器代码生成。
词法和语法分析#
词法: 将字符序列转换为标记序列的过程。
Go语言中Scanner结构体(syntax.scanner)持有当前扫描的数据源文件、启用的模式和当前被扫描到的 Token.
 1
 2
 3
 4
 5
 6
 7
 8
 9
10
11
12
13
14
15
|
type scanner struct {
	source
	mode   uint
	nlsemi bool

	// current token, valid after calling next()
	line, col uint
	blank     bool // line is blank up to col
	tok       token
	lit       string   // valid if tok is _Name, _Literal, or _Semi ("semicolon", "newline", or "EOF"); may be malformed if bad is true
	bad       bool     // valid if tok is _Literal, true if a syntax error occurred, lit may be malformed
	kind      LitKind  // valid if tok is _Literal
	op        Operator // valid if tok is _Operator, _AssignOp, or _IncOp
	prec      int      // valid if tok is _Operator, _AssignOp, or _IncOp
}
|
词法分析主要是由scanner中的next方法,将字面量、操作符、分隔符和关键字等区别开,swich case 判断。
 1
 2
 3
 4
 5
 6
 7
 8
 9
10
11
12
13
14
15
16
17
18
19
20
21
22
23
24
25
26
|
func (s *scanner) next() {
	...
	s.stop()
	startLine, startCol := s.pos()
	for s.ch == ' ' || s.ch == '\t' || s.ch == '\n' && !nlsemi || s.ch == '\r' {
		s.nextch()
	}

	s.line, s.col = s.pos()
	s.blank = s.line > startLine || startCol == colbase
	s.start()
	if isLetter(s.ch) || s.ch >= utf8.RuneSelf && s.atIdentChar(true) {
		s.nextch()
		s.ident()
		return
	}

	switch s.ch {
	case -1:
		s.tok = _EOF

	case '0', '1', '2', '3', '4', '5', '6', '7', '8', '9':
		s.number(false)
	...
	}
}
|
语法:词法输出的token序列是语法分析器的输入,进而确定语法结构
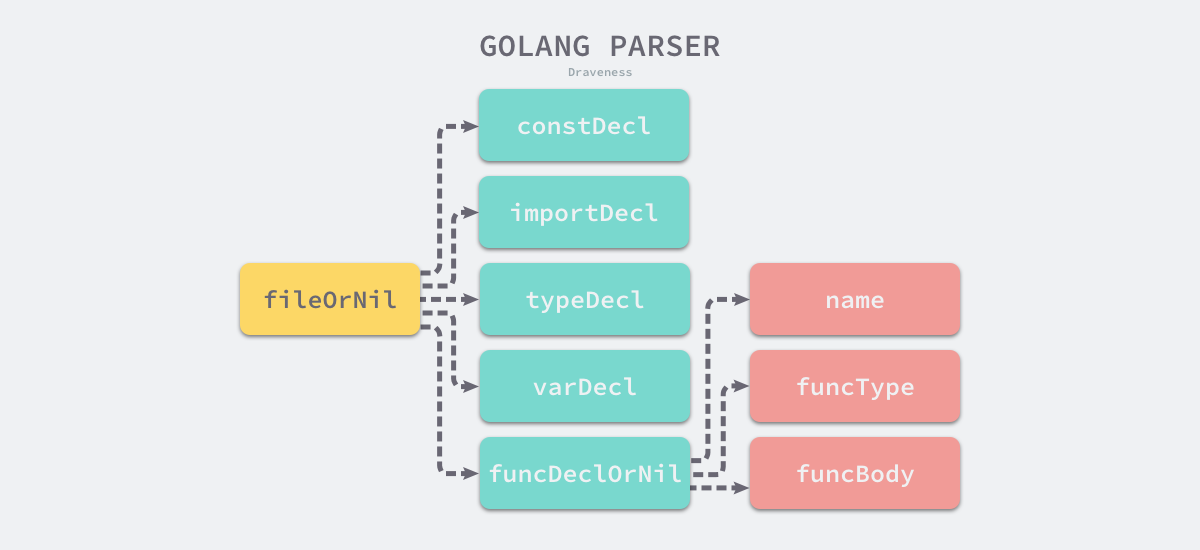
Go 语言的解析器使用了 LALR(1) 的文法来解析词法分析过程中输出的 Token 序列,最右推导加向前查看构成了 Go 语言解析器的最基本原理,也是大多数编程语言的选择。
Go语言文法的实现是parser结构体的fileOrNil方法。
类型检查#
强弱类型
- 强类型的编程语言在编译期间会有更严格的类型限制,也就是编译器会在编译期间发现变量赋值、返回值和函数调用时的类型错误; (Go, JAVA)
- 弱类型的编程语言在出现类型错误时可能会在运行时进行隐式的类型转换,在类型转换时可能会造成运行错误。
静态类型和动态类型
静态类型:基于对源代码的分析来确定运行程序类型安全的过程。 在重构时能够帮助我们节省大量时间并避免遗漏。
动态类型:在运行时确定程序类型安全的过程,它需要编程语言在编译时为所有的对象加入类型标签等信息,运行时可以使用这些存储的类型信息来实现动态派发、向下转型、反射以及其他特性。
What about Go?
Go 语言的编译器不仅使用静态类型检查来保证程序运行的类型安全,还会在编程期间引入类型信息,让工程师能够使用反射(reflect)来判断参数和变量的类型。当我们想要将 interface{} 转换成具体类型时会进行动态类型检查,如果无法发生转换就会发生程序崩溃。
Go编译器类型检查的主要逻辑在 cmd/compile/internal/gc.typecheck 和cmd/compile/internal/gc.typecheck1中。
中间代码生成#

中间代码的生成过程是从 AST 抽象语法树到 SSA 中间代码的转换过程。在这期间会对语法树中的关键字再进行改写,改写后的语法树会经过多轮处理转变成最后的 SSA 中间代码,相关代码中包括了大量 switch 语句、复杂的函数和调用栈,阅读和分析起来也非常困难。
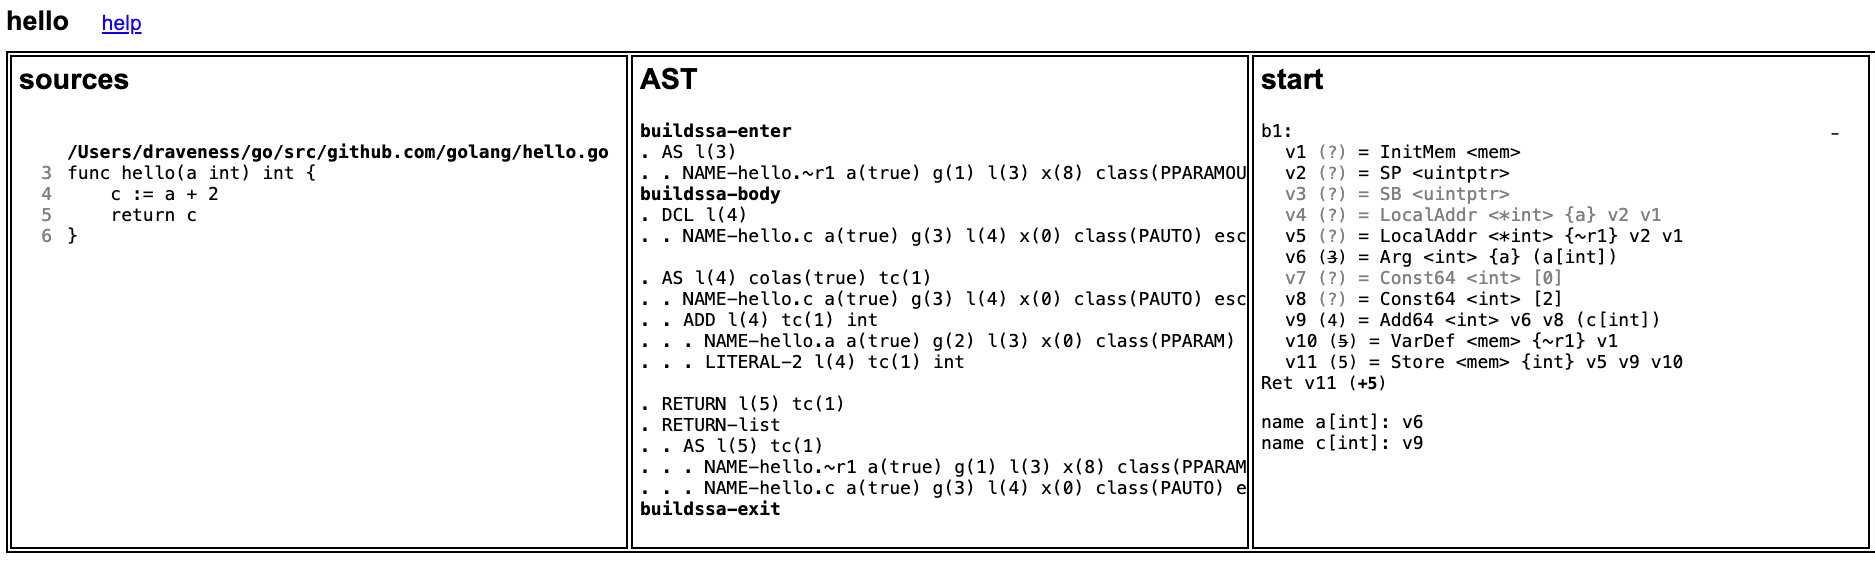
图 SSA 中间代码生成过程
机器码生成#
指令集架构
复杂指令集(CISC): 指令数目多并且复杂,每条指令的字节长度并不相等。– x86
精简指令集(RISC):指令的数目和寻址方式做了精简,大大减少指令数量的同时更容易实现,指令集中的每一个指令都使用标准的字节长度、执行时间相比复杂指令集会少很多,处理器在处理指令时也可以流水执行,提高了对并行的支持。– arm
Chapter 3 数据结构#
3.1 数组#
数组: 由相同类型的元素构成的数据结构,分配一块连续的内存来保存该元素。
GO语言中的数组#
初始化
初始化两种方式:显式指定数组大小;隐式创建在编译期通过源代码推导数组大小。
1
2
|
arr1 := [5]int{1,2,3,4,5}
arr2 := [...]int{1,2,3,4,5} // 相同,编译期执行推导得知数组的大小
|
使用[…]T形式创建数组时, cmd/compile/internal/gc.typecheckcomplict函数对数组大小进行推导
 1
 2
 3
 4
 5
 6
 7
 8
 9
10
11
12
13
14
15
16
17
18
19
20
21
22
23
24
25
26
|
func typecheckcomplit(n *Node) (res *Node) {
	...
	if n.Right.Op == OTARRAY && n.Right.Left != nil && n.Right.Left.Op == ODDD {
		n.Right.Right = typecheck(n.Right.Right, ctxType)
		if n.Right.Right.Type == nil {
			n.Type = nil
			return n
		}
		elemType := n.Right.Right.Type

		length := typecheckarraylit(elemType, -1, n.List.Slice(), "array literal")
		// 遍历元素得到数组长度,即元素数量(语法糖)
		n.Op = OARRAYLIT
		n.Type = types.NewArray(elemType, length)
		n.Right = nil
		return n
	}
	...

	switch t.Etype {
	case TARRAY:
		typecheckarraylit(t.Elem(), t.NumElem(), n.List.Slice(), "array literal")
		n.Op = OARRAYLIT
		n.Right = nil
	}
}
|
阅读cmd/compile/internal/types.NewArray函数得知,数组是否在堆栈中初始化是在编译期就已经确定。
1
2
3
4
5
6
7
8
9
|
func NewArray(elem *Type, bound int64) *Type {
	if bound < 0 {
		Fatalf("NewArray: invalid bound %v", bound)
	}
	t := New(TARRAY)
	t.Extra = &Array{Elem: elem, Bound: bound}
	t.SetNotInHeap(elem.NotInHeap())          // heap or not heap
	return t
}
|
初始化数组后无法改变大小。完全相同的数组要满足存储类型相同且大小相同两个条件。
初始化字面量(元素数量)<= 4 , 直接将数组中的元素置于栈上
初始化字面量(元素数量)> 4, 直接将数组中的元素置于静态区并在运行时取出
细节:
 1
 2
 3
 4
 5
 6
 7
 8
 9
10
11
12
13
14
15
16
17
18
19
20
21
22
23
24
25
26
27
28
29
30
31
32
33
34
35
36
37
38
39
40
41
42
43
44
45
|
func anylit(n *Node, var_ *Node, init *Nodes) {
	t := n.Type
	switch n.Op {
	case OSTRUCTLIT, OARRAYLIT:
		if n.List.Len() > 4 {
			vstat := staticname(t)
			vstat.Name.SetReadonly(true)
			// 数量大于4,设置静态区vstat
      // ex: var arr [3]int
      // statictmp_0[0] = 1 statictmp_0[1] = 2 statictmp_0[2] = 3
      // arr = statictmp_0
			fixedlit(inNonInitFunction, initKindStatic, n, vstat, init)

			a := nod(OAS, var_, vstat)
			a = typecheck(a, ctxStmt)
			a = walkexpr(a, init)
			init.Append(a)
			break
		}
    // 小于4,要看类型是不是initKindLocalCode来决定是否拆分表达式来初始化
    // ex: if initKindLocalCode
    // var arr [3]int -> arr[0] = 1 arr[1] = 2 arr[2] = 3
		fixedlit(inInitFunction, initKindLocalCode, n, var_, init)
		...
	}
}

func fixedlit(ctxt initContext, kind initKind, n *Node, var_ *Node, init *Nodes) {
	var splitnode func(*Node) (a *Node, value *Node)
	...

	for _, r := range n.List.Slice() {
		a, value := splitnode(r)
		a = nod(OAS, a, value)
		a = typecheck(a, ctxStmt)
		switch kind {
		case initKindStatic:
			genAsStatic(a)
		case initKindLocalCode:
			a = orderStmtInPlace(a, map[string][]*Node{})
			a = walkstmt(a)
			init.Append(a)
		}
	}
}
|
访问和赋值
关键点:index,数组长度,元素类型
编译期间:简单越界错误检查,无法判断时加入PanicBounds 指令交给运行时判断。
读取数组内存地址,index,加载到内存进行读写操作
运行期间:runtime.panicIndex & goPanicIndex 触发错误导致退出
3.2 切片#
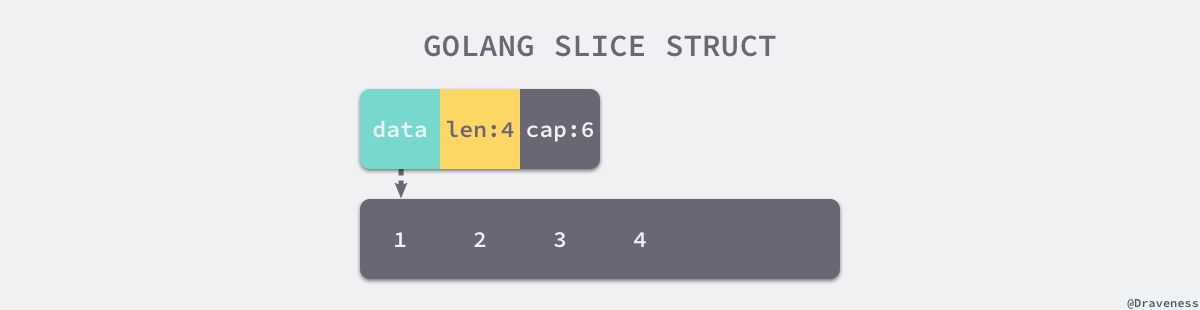
数据结构#
1
2
3
4
5
|
type SliceHeader struct {
	Data uintptr 				// 指向数组的指针
	Len  int						// 切片长度
	Cap  int						// 切片容量,即Data数组大小
}
|
切片内元素的类型都是在编译期间确定,方便运行时动态获取
切片底层数组长度不足会发生扩容,切片指向数组可能发生变化,但是不影响上层和coder的交互。
切片在运行时才会确定内容,其操作需要依赖运行时,和数组不同。
初始化(三种方式)#
- newslice := array[0:n]
最底层的方式,效率最高
- newslice := []int{1,2,3}
```go
var vstat [3]int
vstat[0] = 1
vstat[1] = 2
vstat[2] = 3
var vauto *[3]int = new([3]int)
*vauto = vstat
slice := vauto[:]

/*
根据切片中的元素数量对底层数组的大小进行推断并创建一个数组;
将这些字面量元素存储到初始化的数组中;
创建一个同样指向 [3]int 类型的数组指针;
将静态存储区的数组 vstat 赋值给 vauto 指针所在的地址;
通过 [:] 操作获取一个底层使用 vauto 的切片;
*/

// 大部分编译期间完成
```
- newslice := make([]int, 10)
 1
 2
 3
 4
 5
 6
 7
 8
 9
10
11
12
13
14
15
16
17
18
19
20
21
22
23
24
25
26
27
28
29
|
// 编译阶段进行len等参数检查
// 编译阶段判断判断切片是否发生逃逸,最终在堆上初始化

// 大量工作在运行时进行 runtime.makeslice
func makeslice(et *_type, len, cap int) unsafe.Pointer {
  mem, overflow := math.MulUintptr(et.size, uintptr(cap))
  if overflow || mem > maxAlloc || len < 0 || len > cap {
      mem, overflow := math.MulUintptr(et.size, uintptr(len))
      if overflow || mem > maxAlloc || len < 0 {
          panicmakeslicelen()
      }
      panicmakeslicecap()
  }

  return mallocgc(mem, et, true)
}
// 内存空间=切片中元素大小×切片容量
/* 可能触发的错误:
      内存空间的大小发生了溢出;
      申请的内存大于最大可分配的内存;
      传入的长度小于 0 或者长度大于容量;
*/

type SliceHeader struct {
  Data uintptr
  Len  int
  Cap  int
}
// 大多数对切片类型的操作并不需要直接操作原来的runtime.slice,引入SliceHeader减少切片初始化开销
|
访问元素#
len 和 cap在编译阶段将它们分别转换成 OpSliceLen 和 OpSliceCap。一些情况下触发“decompose builtin”优化,可被直接替换成参数,不需要运行时获取。
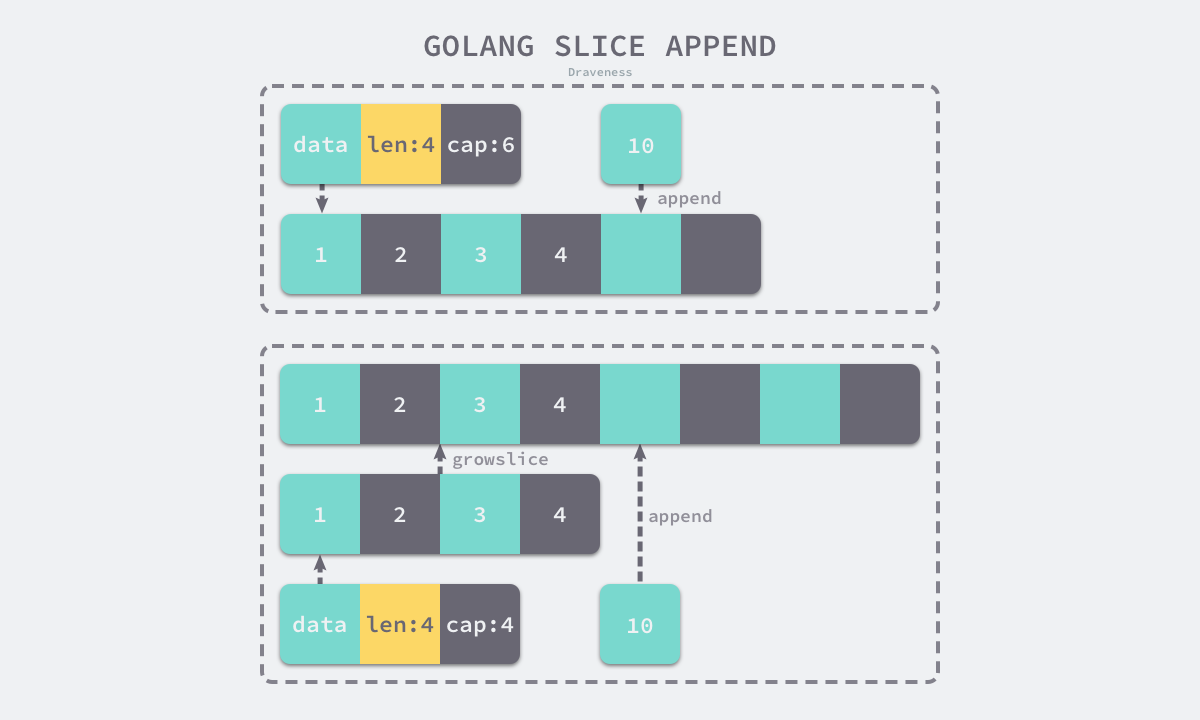
追加和扩容#
 1
 2
 3
 4
 5
 6
 7
 8
 9
10
11
12
13
14
15
16
17
18
19
20
21
22
23
24
25
26
27
28
29
30
31
32
33
34
35
36
37
38
39
40
41
42
43
44
45
46
|
// 扩容策略: growslice
/*
	如果期望容量大于当前容量的两倍就会使用期望容量;
	如果当前切片的长度小于 1024 就会将容量翻倍;
	如果当前切片的长度大于 1024 就会每次增加 25% 的容量,直到新容量大于期望容量;
*/
func growslice(et *_type, old slice, cap int) slice {
	newcap := old.cap
	doublecap := newcap + newcap
	if cap > doublecap {
		newcap = cap
	} else {
		if old.len < 1024 {
			newcap = doublecap
		} else {
			for 0 < newcap && newcap < cap {
				newcap += newcap / 4
			}
			if newcap <= 0 {
				newcap = cap
			}
		}
	}

// 当切片中元素所占的字节大小为 1、8 或者 2 的倍数时,运行时会使用如下所示的代码对齐内存
	var overflow bool
	var lenmem, newlenmem, capmem uintptr
	switch {
	case et.size == 1:
		lenmem = uintptr(old.len)
		newlenmem = uintptr(cap)
		capmem = roundupsize(uintptr(newcap))
		overflow = uintptr(newcap) > maxAlloc
		newcap = int(capmem)
	case et.size == sys.PtrSize:
		lenmem = uintptr(old.len) * sys.PtrSize
		newlenmem = uintptr(cap) * sys.PtrSize
		capmem = roundupsize(uintptr(newcap) * sys.PtrSize)
		overflow = uintptr(newcap) > maxAlloc/sys.PtrSize
		newcap = int(capmem / sys.PtrSize)
	case isPowerOfTwo(et.size):
		...
	default:
		...
	}
// runtime.rouddupsize 函数会将待申请的内存向上取整
|
copy(slice_a, slice_b)
在大切片上执行拷贝操作时一定要注意对性能的影响
runtime.memmove负责拷贝内存, 如果拷贝是在运行时发生的,用runtime.slicecopy替代运行期间的copy
 1
 2
 3
 4
 5
 6
 7
 8
 9
10
11
12
13
14
15
16
17
18
19
20
21
22
|
func slicecopy(to, fm slice, width uintptr) int {
	if fm.len == 0 || to.len == 0 {
		return 0
	}
	n := fm.len
	if to.len < n {
		n = to.len
	}
	if width == 0 {
		return n
	}
	...

	size := uintptr(n) * width
	if size == 1 {
		*(*byte)(to.array) = *(*byte)(fm.array)
	} else {
    // 本质都是runtime.memmove
		memmove(to.array, fm.array, size)
	}
	return n
}
|
3.3 哈希表#
数据结构#
 1
 2
 3
 4
 5
 6
 7
 8
 9
10
11
12
13
14
15
16
17
18
19
20
21
22
23
|
type hmap struct {
	count     int									// 哈希表中的元素数量
	flags     uint8
	B         uint8								// 哈希表持有的 buckets 数量, len(buckets) == 2^B
	noverflow uint16
	hash0     uint32							// 哈希种子

	buckets    unsafe.Pointer			// runtime.bmap, 每个桶存8个键值对,单个桶装满存到extra溢出桶
	oldbuckets unsafe.Pointer			// 扩容被替换的buckets,容量是buckets的一半
	nevacuate  uintptr

	extra *mapextra
}

type mapextra struct {
	overflow    *[]*bmap
	oldoverflow *[]*bmap
	nextOverflow *bmap
}

type bmap struct {
	tophash [bucketCnt]uint8			// 存储了键的哈希的高 8 位, 减少访问键值对次数以提高性能
}
|
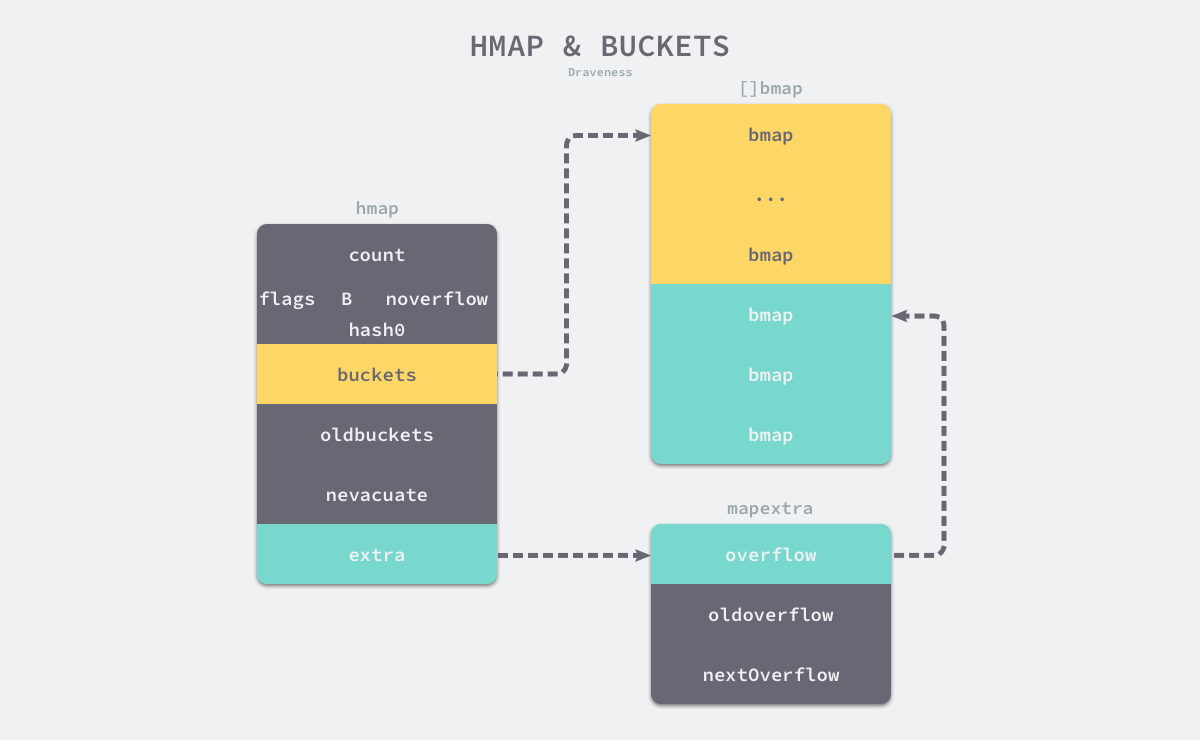
上图中黄色的 runtime.bmap 就是正常桶,绿色的 runtime.bmap 是溢出桶,溢出桶是在 Go 语言还使用 C 语言实现时使用的设计,由于它能够减少扩容的频率所以一直使用至今。
随着哈希表存储的数据逐渐增多,我们会扩容哈希表或者使用额外的桶存储溢出的数据,不会让单个桶中的数据超过 8 个,不过溢出桶只是临时的解决方案,创建过多的溢出桶最终也会导致哈希的扩容。
初始化#
字面量初始化,哈希表中的元素数量少于或者等于 25 个时,会直接make map,将元素一次性加到map中
1
2
3
4
|
hash := make(map[string]int, 3)
hash["1"] = 2
hash["3"] = 4
hash["5"] = 6
|
数目超过25个时候,会创建两个切片存储key value,然后for循环加入map
1
2
3
4
5
6
|
hash := make(map[string]int, 26)
vstatk := []string{"1", "2", "3", ... , "26"}
vstatv := []int{1, 2, 3, ... , 26}
for i := 0; i < len(vstak); i++ {
    hash[vstatk[i]] = vstatv[i]
}
|
运行时转换成runtime.makemap
 1
 2
 3
 4
 5
 6
 7
 8
 9
10
11
12
13
14
15
16
17
18
19
20
21
22
23
24
25
26
27
28
29
30
31
32
33
34
35
36
37
38
39
40
41
42
43
44
45
46
47
48
49
50
51
52
53
54
55
56
57
58
|
func makemap(t *maptype, hint int, h *hmap) *hmap {
	mem, overflow := math.MulUintptr(uintptr(hint), t.bucket.size)
	if overflow || mem > maxAlloc {
		hint = 0
	}

	if h == nil {
		h = new(hmap)
	}
	h.hash0 = fastrand()

	B := uint8(0)
	for overLoadFactor(hint, B) {
		B++
	}
	h.B = B

	if h.B != 0 {
		var nextOverflow *bmap
		h.buckets, nextOverflow = makeBucketArray(t, h.B, nil) // B -> bucket的数量
		if nextOverflow != nil {
			h.extra = new(mapextra)
			h.extra.nextOverflow = nextOverflow
		}
	}
	return h
}
/*
	计算哈希占用的内存是否溢出或者超出能分配的最大值;
	调用 runtime.fastrand 获取一个随机的哈希种子;
	根据传入的 hint 计算出需要的最小需要的桶的数量;
	使用 runtime.makeBucketArray 创建用于保存桶的数组;
*/

func makeBucketArray(t *maptype, b uint8, dirtyalloc unsafe.Pointer) (buckets unsafe.Pointer, nextOverflow *bmap) {
	base := bucketShift(b)
	nbuckets := base
	if b >= 4 {
		nbuckets += bucketShift(b - 4)
		sz := t.bucket.size * nbuckets
		up := roundupsize(sz)
		if up != sz {
			nbuckets = up / t.bucket.size
		}
	}

	buckets = newarray(t.bucket, int(nbuckets))
	if base != nbuckets {
		nextOverflow = (*bmap)(add(buckets, base*uintptr(t.bucketsize)))
		last := (*bmap)(add(buckets, (nbuckets-1)*uintptr(t.bucketsize)))
		last.setoverflow(t, (*bmap)(buckets))
	}
	return buckets, nextOverflow
}
/*
	当桶的数量小于 2^4时,由于数据较少、使用溢出桶的可能性较低,会省略创建的过程以减少额外开销;
	当桶的数量多于 2^4 时,会额外创建 2^(𝐵−4)个溢出桶;
*/
|
访问map元素,都通过编译期转换成OINDEXMAP操作,然后在SSA阶段转换成下列函数
 1
 2
 3
 4
 5
 6
 7
 8
 9
10
11
12
13
14
15
16
17
18
19
20
21
22
23
24
25
26
27
28
29
30
31
32
|
v     := hash[key] // => v     := *mapaccess1(maptype, hash, &key)
v, ok := hash[key] // => v, ok := mapaccess2(maptype, hash, &key)

/*
	通过哈希表设置的哈希函数、种子获取当前键对应的哈希
	再通过runtime.bucketMask 和 runtime.add 拿到该键值对所在的桶序号和哈希高位的 8 位数字
*/
func mapaccess1(t *maptype, h *hmap, key unsafe.Pointer) unsafe.Pointer {
	alg := t.key.alg
	hash := alg.hash(key, uintptr(h.hash0))
	m := bucketMask(h.B)
	b := (*bmap)(add(h.buckets, (hash&m)*uintptr(t.bucketsize)))
	top := tophash(hash)
bucketloop:
	for ; b != nil; b = b.overflow(t) {
		for i := uintptr(0); i < bucketCnt; i++ {
			if b.tophash[i] != top {
        // 先比较哈希的高 8 位和桶中存储的 tophash, 加速数据的读写
				if b.tophash[i] == emptyRest {
					break bucketloop
				}
				continue
			}
			k := add(unsafe.Pointer(b), dataOffset+i*uintptr(t.keysize))
			if alg.equal(key, k) {
				v := add(unsafe.Pointer(b), dataOffset+bucketCnt*uintptr(t.keysize)+i*uintptr(t.valuesize))
				return v
			}
		}
	}
	return unsafe.Pointer(&zeroVal[0])
}
|
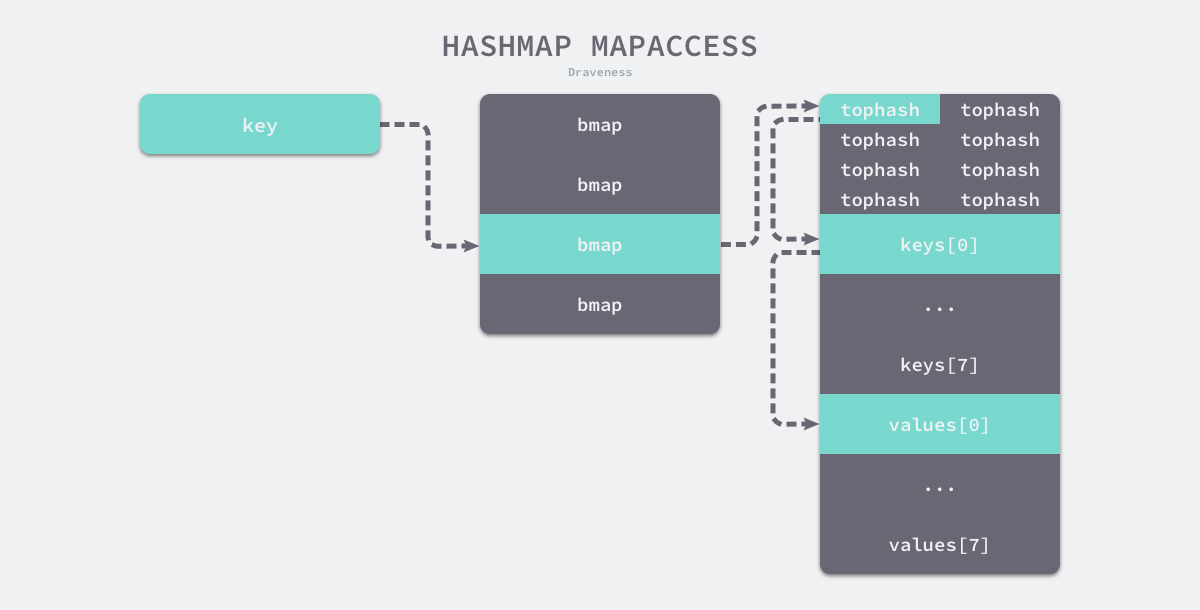
图 - 访问map内数据的过程
写入是转换为runtime.mapassign的函数调用,与mapaccess1思路比较类似。( 依次遍历正常桶和溢出桶中存储的数据,整个过程会分别判断 tophash 是否相等、key 是否相等,遍历结束后会从循环中跳出;不存在的情况下会规划新的存储key-value的地址,通过runtime.typedmemmove写入地址中)
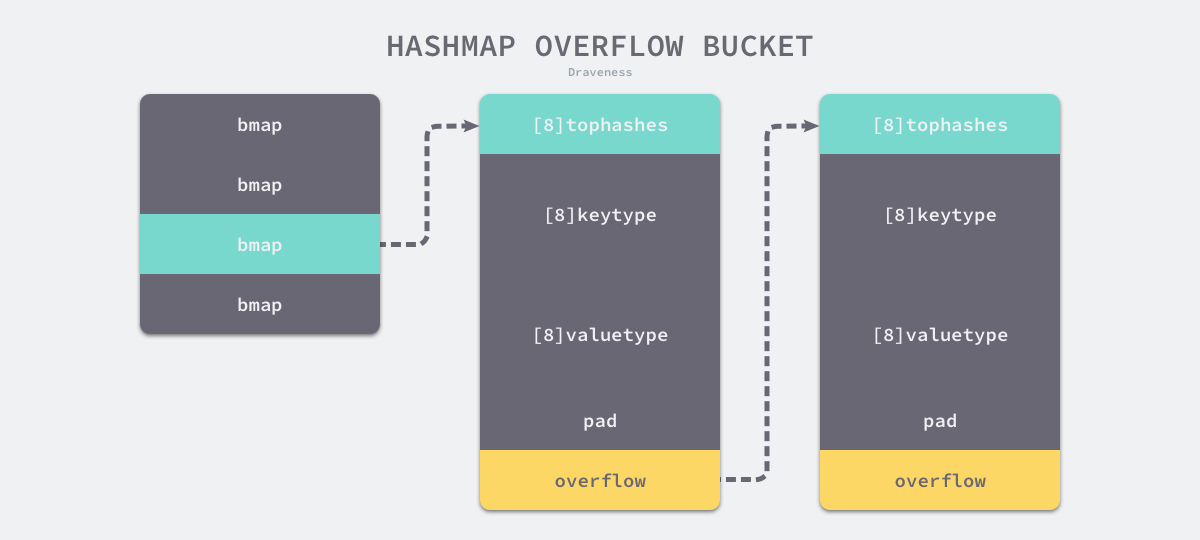
图 - 哈希遍历溢出桶
触发条件:
1.装载因子已经超过 6.5,翻倍扩容
2.哈希使用了太多溢出桶,等量扩容
扩容过程:
runtime.makeBucketArray 创建一组新桶和预创建的溢出桶,随后将原有的桶数组设置到 oldbuckets 上并将新的空桶设置到 buckets 上,溢出桶也使用了相同的逻辑更新。
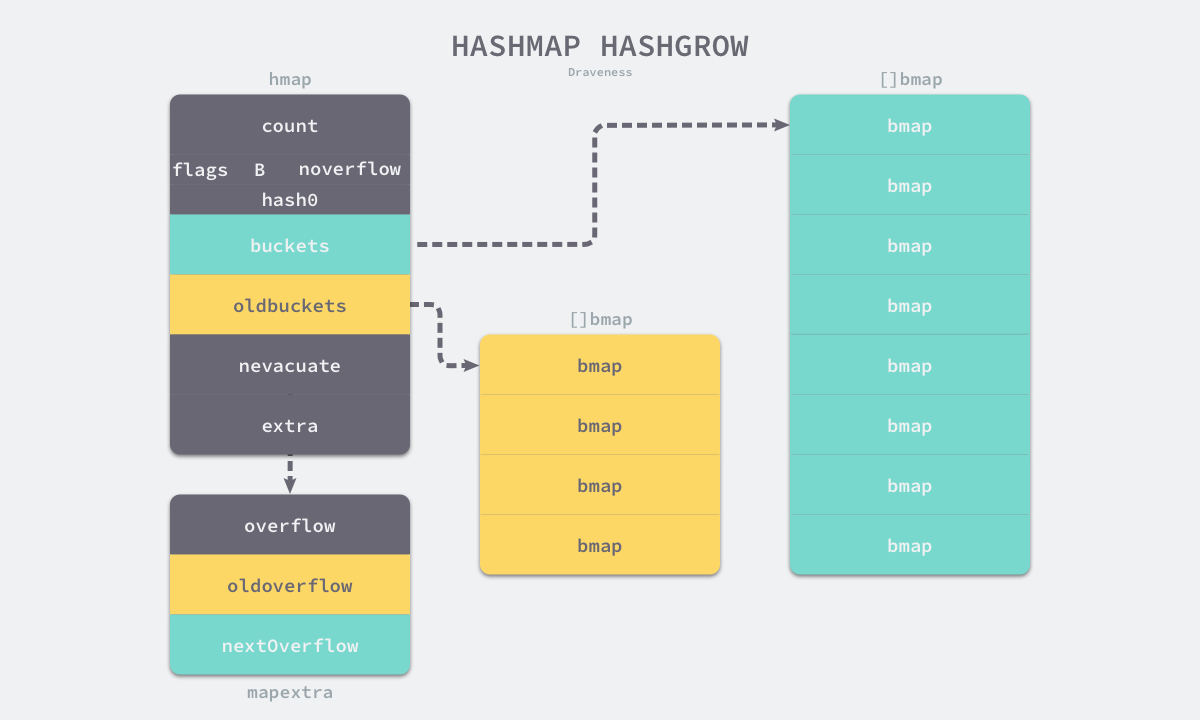
图 - 哈希表触发扩容
数据分流/迁移:
runtime.evacuate 会将一个旧桶中的数据分流到两个新桶(等量扩容时候就是一个新桶),所以它会创建两个用于保存分配上下文的 runtime.evacDst 结构体,这两个结构体分别指向了一个新桶。分流后清空哈希的 oldbuckets 和 oldoverflow。
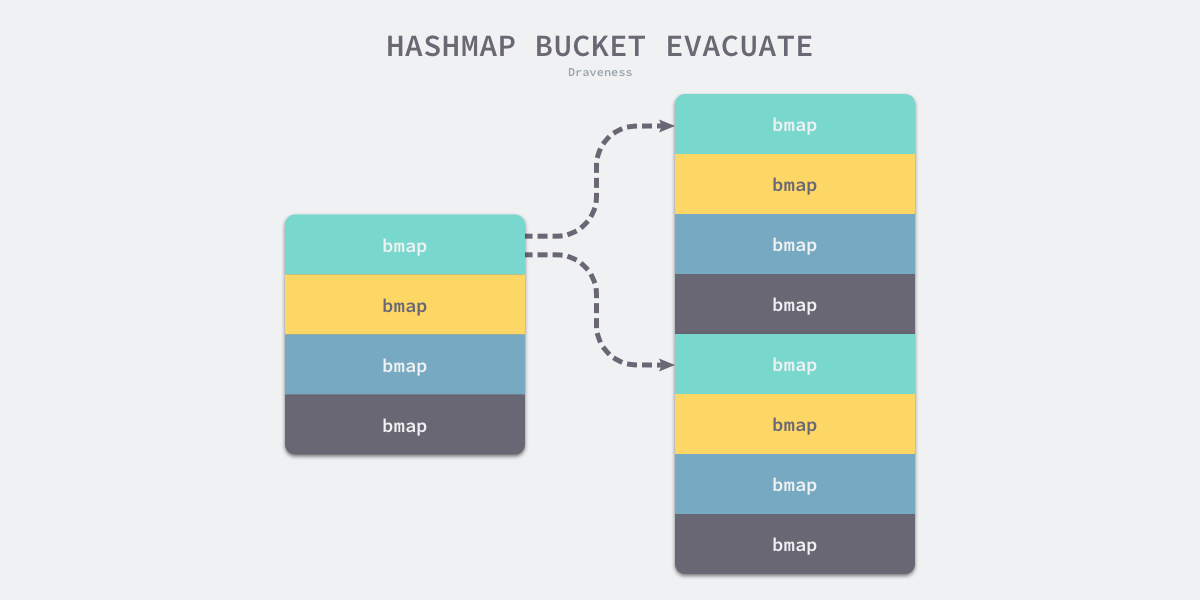
图 - 哈希表桶数据的分流
逻辑与写入类似,触发哈希的删除需要使用关键字,在删除期间遇到了哈希表的扩容,就会分流桶中的元素,分流结束之后会找到桶中的目标元素完成键值对的删除工作。
3.4 字符串#
由字符构成的数组,连续的只读内存空间。修改字符串需要通过string -> []byte的类型转换。
数据结构#
1
2
3
4
5
|
type StringHeader struct {
	Data uintptr
	Len  int
}
// 只读,和切片的结构很相似
|
解析过程#
1
2
3
4
5
6
|
str1 := "this is a string"
// 使用反引号时,因为双引号不再负责标记字符串的开始和结束,我们可以在字符串内部直接使用 "
str2 := `this is another
string`
|
 1
 2
 3
 4
 5
 6
 7
 8
 9
10
11
12
13
14
15
16
17
18
19
20
21
22
23
24
25
26
27
|
// 调用 runtime.concatstrings,它会先对遍历传入的切片参数,再过滤空字符串并计算拼接后字符串的长度
func concatstrings(buf *tmpBuf, a []string) string {
	idx := 0
	l := 0
	count := 0
	for i, x := range a {
		n := len(x)
		if n == 0 {
			continue
		}
		l += n
		count++
		idx = i
	}
	if count == 0 {
		return ""
	}
	if count == 1 && (buf != nil || !stringDataOnStack(a[idx])) {
		return a[idx]
	}
	s, b := rawstringtmp(buf, l)
	for _, x := range a {
		copy(b, x)
		b = b[len(x):]
	}
	return s
}
|
类型转换#
类型转换开销不少,经常会成为程序的性能热点。
 1
 2
 3
 4
 5
 6
 7
 8
 9
10
11
12
13
14
15
16
17
18
19
20
21
22
23
24
25
26
27
28
29
30
31
32
33
34
35
36
37
|
// 字节数组到字符串 -> runtime.slicebytetostring
func slicebytetostring(buf *tmpBuf, b []byte) (str string) {
	l := len(b)
	if l == 0 {
		return ""
	}
	if l == 1 {
		stringStructOf(&str).str = unsafe.Pointer(&staticbytes[b[0]])
		stringStructOf(&str).len = 1
		return
	}
	var p unsafe.Pointer
	if buf != nil && len(b) <= len(buf) {
		p = unsafe.Pointer(buf)
	} else {
		p = mallocgc(uintptr(len(b)), nil, false)
	}
  // 字符串指针转换成 runtime.stringStruct 结构体指针,然后设置结构体持有的字符串指针 str 和长度 len
	stringStructOf(&str).str = p
	stringStructOf(&str).len = len(b)
  // []byte 中的字节全部复制到新的内存空间中
	memmove(p, (*(*slice)(unsafe.Pointer(&b))).array, uintptr(len(b)))
	return
}

// 字符串到[]byte
func stringtoslicebyte(buf *tmpBuf, s string) []byte {
	var b []byte
	if buf != nil && len(s) <= len(buf) {
		*buf = tmpBuf{}
		b = buf[:len(s)]
	} else {
		b = rawbyteslice(len(s))
	}
	copy(b, s)
	return b
}
|
Chapter 4 语言基础#